IPS Service configuration
Most of the necessary settings for the IPS service are automatically set during the installation of IPS Server, or when the service account is created. You will mostly need to check the following sections in case of troubleshooting, or if changing the service account to a different account.
Set the service logon
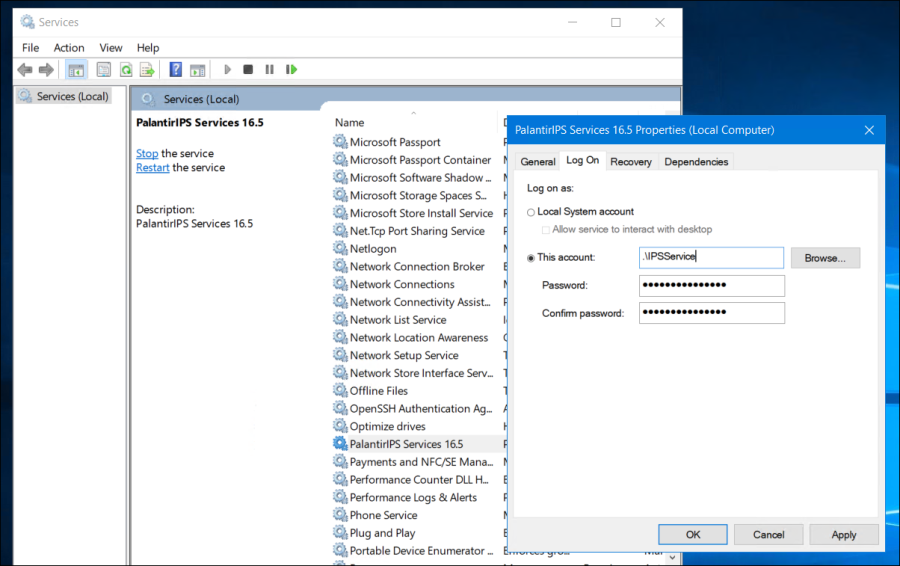
The service logon should be set to use the IPS service account. In Server Manager, open the Services tool and double-click the service name 'PalantirIPS Services 16.5' (or if you have installed a Service Pack release, the name will be 'PalantirIPS Services 16.5 SP1' or similar), and select the 'Log On' tab:

Enter the IPS Service account name and password, and click OK to close the dialog.
Service Recovery configuration
For version 16.5 Update 5 and later: This update release introduced new behavior in the IPS Server to deal with 'soft restart loops': these are occasional situations where the IPS Server is not able to use a 'soft' process restart to clear up problems. In the new behavior, when process restarts fail to clear a problem after a certain amount of time, IPS Server will request the Windows OS to perform a complete Stop of the Windows service.
It is important that the service Recovery configuration in Windows is set to automatically respond to this possibility.
Administrators are recommended to make use of the standard Windows service recovery settings to handle this, by setting the service to automatically restart. (It is also possible to configure restarting the server machine after a number of service restarts.)
To change the failure actions, open the properties for the PalantirIPS service and select the Recovery tab:

The simplest option is to set all three of the 'Failure' actions to Restart the Service, and to set a few minutes delay before the restart takes place.
Register ports to the IPS service account
The web port (default 80, or 443 for HTTPS) and the monitor port (default 81) must be registered (reserved) to the service account.
Note that all of the following commands must be run in an elevated (Administrator) PowerShell or command prompt.
Check the existing port reservations with the command:
netsh http show urlaclTo un-register accounts/services from a port, use the command:
netsh http delete urlacl url=http://+:80/or for HTTPS,
netsh http delete urlacl url=https://+:443/Substitute different port numbers if you are not using the defaults.
Use the following commands to register ports to the IPS service account:
netsh http add urlacl url=http://+:80/ user=DOMAIN\SERVICEACCOUNTUSERor
netsh http add urlacl url=https://+:443/ user=DOMAIN\SERVICEACCOUNTUSERAnd for the monitor port:
netsh http add urlacl url=http://+:81/ user=DOMAIN\SERVICEACCOUNTUSERIf you are using HTTPS there are additional steps required to configure the service certificate. See Setting up HTTPS (secure HTTP) for IPS Server.
Set access permissions for the 'ProgramData' folder used by the Planning Space applications
Set permissions for the IPS service account to read/write/modify the 'ProgramData' folder, whose default value is:
C:\ProgramData\Palantir\PalantirIPS 16.5
(This value will have been set during installation.)
To do this, you can right click on the folder in File Explorer, select Properties, and select the Security tab. Click the Edit button, and then:
- if the service account is not in the list of accounts, click 'Add' to add the account;
- click the service account name in the list, and click the tick box 'Full Control--Allow';
Click the 'OK' button to save the changes.
Set access permissions for the Cluster Shared Temp folder
The IPS service account must have permissions to read/write/modify the Cluster Shared Temp folder.
Note: if the service account is defined as a local account on a server machine, such accounts do not by default have access to networked file shares.
Set membership of the 'Performance Monitor Users' local Windows group
The IPS service account must be a member of the local Windows group 'Performance Monitor Users' on each IPS Server machine, in order for IPS Server to access process performance data on that machine. These data are displayed in the PalantirIPS Server Monitor web interface.
Normally the IPS Server installation program will automatically set up the required membership.
If the service account is changed, then the group membership will need to be modified, by using the Windows 'local user manager' application ('lusrmgr.msc').
Note: if the IPS server program 'Palantir.IPS.Server.exe' is run from the command line as a console application, and not as a service (see IPS Server command line: Options for advanced configuration and troubleshooting), you may need to grant membership of 'Performance Monitor Users' to the Windows account that is running the program.
Restart the IPS Service to implement service account changes
You need to restart the PalantirIPS service to implement the above changes. In the Services tool, use right-click on the service name to do this.
It is recommended to use the Event Viewer tool (in Windows Server Manager > Tools) to make sure that the IPS service completes all of its starting steps correctly (because its service status will appear as 'Running' before the startup is completed), and any startup errors will be recorded there. Look in the Event Viewer for 'Applications and Services Logs > IPS165 Logs'.
In the case of a conflict on the web port, look for an error of the form: 'Palantir.IPS.Common.Bootstrapper.IpsBootstrapperException: Port 80 is already being used either by an IPS Server or by another process...'
